It happens most of the time when we create presentation files for office meet and any purpose and realize to make some editing later on, but you don’t have the source files (images).
How depressing it would be, and moreover if it contains plenty of images in that PowerPoint presentation.
Then it would be quite scary to even think about to save all the images by taking the screenshots individually as we could also lose the image quality of it.
If you had thought so or anyone suggested you do so, erase that thought from your mind, because we have the better way to extract images from PowerPoint presentation.
There are few methods to quickly extract images from a slideshow. We will discuss three methods in this article, let us check out one after another and opt one according to your requirement and extra image from ppt.
Extract Images from PowerPoint Presentation – First Method
Step 1. Head towards the menu File – Save As
Step 2. Choose the location where you would like to save and keep the extension as .html
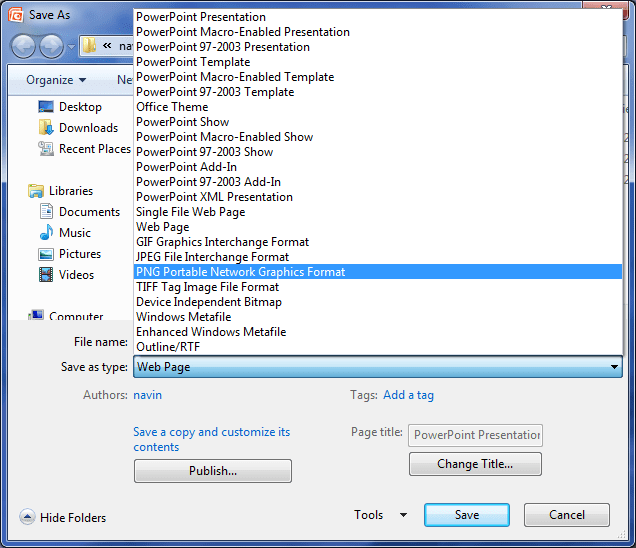
Step 3. Hit the “Save” button.
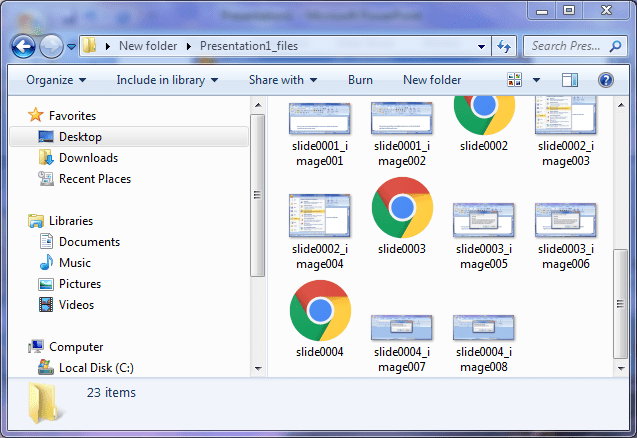
This will save all your image files including along with the web pages. In case you would like to download only the image files the second below option is for you.
Extract photos from PowerPoint Presentation – Second Method
Step 1. Open the Presentation file from which you would like to extract the images.
Step 2. Navigate from the menu File – Save as, and choose an image format from the drop-down “Save as type,” JPEG and PNG are the most used ones.
Step 3. Select any file type according to the requirement and click on the “Save” button.
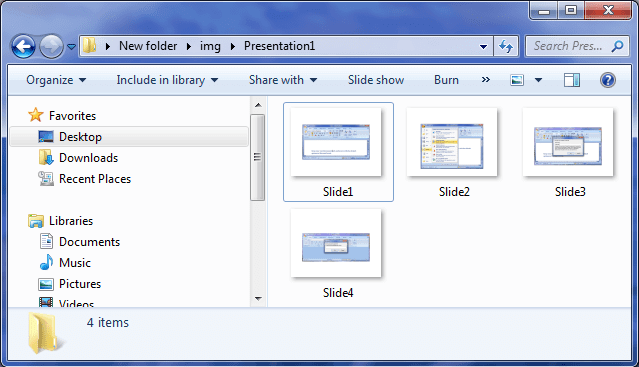
This will export all your image files to the desired folder you have selected on your local drive, as shown in the image below.
And now these images are editable according to the requirement and can be updated later to the PowerPoint document back again.
Extract Images from PowerPoint Presentation – Third Method
Step 1. Make a duplicate of your presentation file and the change the extension to .pptx to .zip
Tip: If you can’t see the extension of the file then, Go To Windows Explorer (Windows+E) – Organize – Folder and Search Options.
Now switch to “View” Tab – and scroll down and uncheck “hide extensions for known file types” you would be able to see the extension now rename it as .zip
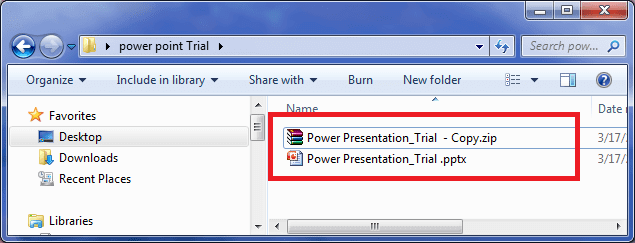
Step 2. Now Extract the .zip file,
Step 3. Once you open the extracted folder, you would be able to see a few more folders in it.
Step 4. Now open folder named as “ppt” from it, and now click on the folder called media. There you would be able to see all the images which are used in the PowerPoint presentation.
There are few tools that extract images online, but I would not recommend going with those as above all are the best ways if you don’t want to compromise with the image quality.
This way we would be able to recover all the files (images), which are being used in the PowerPoint presentation with the same quality as is been uploaded.
Do share with us your thoughts on which method was worked well for you in the comments section below.