YouTube is being a common part of our daily life. As we use to watch several useful videos on a daily basis which enhances our knowledge on the required subject. So now the question is from where all these videos come from, who uploads it.
Actually, there are several individuals who do it. Some people share their personal and memorable videos so that they can view them anytime and refresh their moments in the future.
And some do it to earn money from YouTube by monetizing it, by creating some of their own videos, like tutorials, reviewing some products, sharing their knowledge on tools, etc. And for them,
And for them, branding their YouTube channel to get more and more viewers is very important which is very obvious, as views can generate their revenue.
And for getting constant views subscribers plays the key role, as after subscribing to a YouTube channel, the subscribers get a notification of every video which the channel (user) uploads.
As subscribers play an essential part for YouTuber’s. YouTube has already created a default subscribe button below the title of the video. Which helps out subscribing to the channel. We can also create a subscribe button along with a watermark for branding the channel.
So here we will be looking at how can we create or add an Annotation or subscribe button on the playing video so that it will redirect the viewer to your channel, someone else’s channel, some related videos, website, or anywhere we link the button to.
This works really great and helpful, and it’s kind of YouTube marketing without paying a penny, which sounds very cool.
Annotations help out the YouTuber’s to showcase their work on multiple YouTube videos. made by them.
As it makes it much easier and noticeable to the viewer to check out other videos quickly and also access your channel and explores it, and if they like the videos they can easily subscribe as well to stay tuned what the channel uploads going forward.
How To Add Annotations In Youtube
So here Annotations feature made the search easier for the viewers and also been very useful for YouTuber’s to generate more revenue from the views. Now I hope this all clarifies what annotations all about.
Now let’s see how to get it done.
Step 1. Click on the right top corner of YouTube on your channel picture.
Step 2. Click on “Creator Studio”, then Channel Dashboard will open.
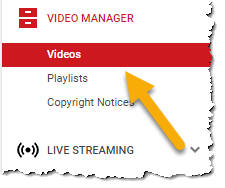
Step 3. Click on “Video Manager”.
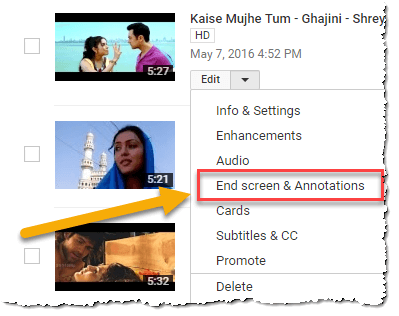
Step 4. On the right side, you will be able to see all the videos uploaded by you, Choose one of the videos and click on Edit.
Step 5. From the drop-down, click on “End Screen and Annotations”, a window will appear.
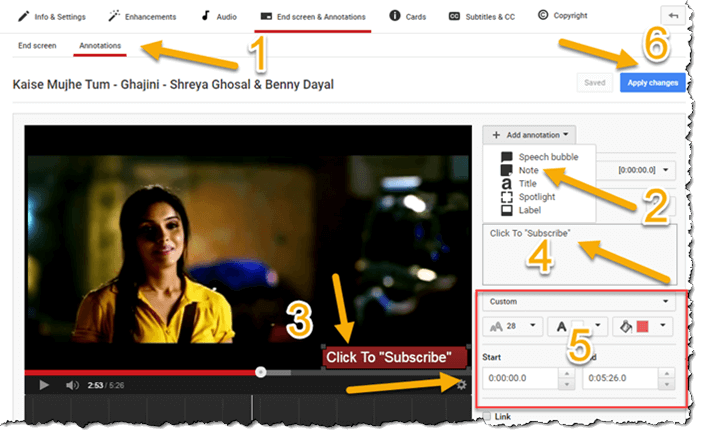
Step 7. Now Pause the Playing Video, so that it should not distract.
- Click on the “Annotations” Tab.
- Then, click on +Add annotation, and choose Note,
- You will be able to see a small patch got added on the screen.
- Add some text on the Text box, for and instance “Click to Subscribe” or your channel name, any other title of the related video, on whatever you want the annotations to be linked with.
- Here the font size, font color, Button color can be customized, and also timing (start time and the end time) can be specified when you want your annotations to appear, again that depends on you completely what you choose.
I recommend keeping the font size 16, Font color white would be appropriate, and the button color red or yellow would be visible properly on the videos and will be eye catchy for the viewer.
In the Timing section, it’s better your annotations to appear around the last 30 seconds of your video so that it should not annoy the viewer.
Step 7: Now the next step is assigning links to the annotations so that it should redirect respectively. This is the main part of this annotation tutorial.
Below the Start time and End Time field, you will be able to find a small radio button, check that field, it will open a few related fields. From the combo box, few options will display.
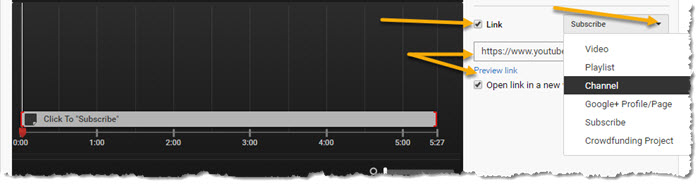
- Video – Select this, if you want to link to another video.
- Playlist – Select this, if you want to link with your customized and suggested videos to the viewer.
- Channel – Select this, if you want to link to other videos.
- Google+ Profile/Page – Select this, if you want to link to your Google profile page.
5. Subscribe – Select this, if you want your user to subscribe to you.
6. Crowd Funding Project – Select this, if you want to link with a website, but all the web links are not allowed. Some of the fundraising links are only acceptable. If you want to know the reason behind it, please go through the link. So here I have chosen the channel, as I want to link the annotation to be linked to my Youtube channel so that the viewer can check out all my videos once he clicks on it.
And also specify the relative link in the URL box. Before applying the changes you can have a preview of the same by clicking on the preview link. Once you are satisfied with the preview, click on Apply changes. All your customization will be saved and most importantly your Annotations will be created. You can place multiple annotations on a video in the same way.
But 2 or 3 would be recommended. Now let us check if the annotations are displaying on the videos. In order to that, go back to your channel and the same video. Let me know if it works or doesn’t work for you in the comment section below.