By default, the first user always becomes the Administrator on Windows. They have full access to the computer, from changing settings to installing new software. Windows allows two types of users, “Administrator “and “Standard.”As mentioned above the administrator has the full access to the computer and the standard user has very limited access,
Standard users can run application and software conveniently. But they won’t be able to install the new ones. Every time they like to do so, they would have to provide the administrator login credentials.
Which is necessary, as windows protect the administrator accounts to avoid changes to happen in the settings. As most of the time, we had to allow family members or any users to access it.
And we are supposed to give them access to install new software or make some changes at times according to the requirement.
So, let us see how to change or add a new administrator or change a standard user to the Administrator in Windows 7. But the process is the same for all the operating systems. There are plenty of ways to do so, two ways explained in this article.
#1. How To Change Administrator in Windows: Step by Step
Step 1. Click on the Start Windows button and then select Control Panel,
Step 2. Click on “User Accounts” from the Control Panel.
Step 3. Now Click on “Manage Other Account,” to access all the users of the computer.
Step 4. Once you could access to the users of the machine, Choose the account you want to manage and click on it.
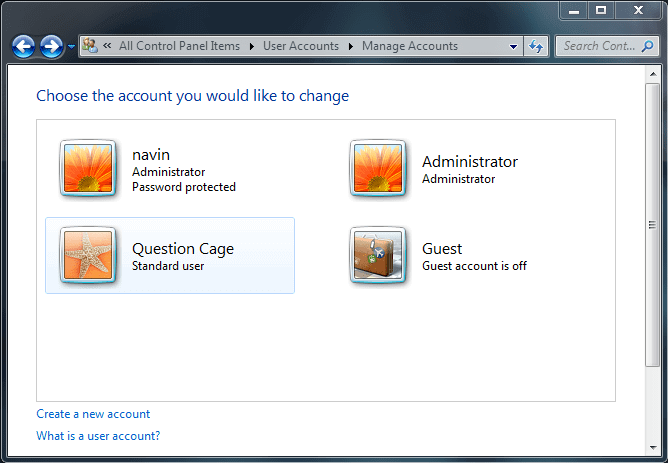
Step 5. You would be able to see many options over there, click on “Change Account Type.”
Step 6. switch the radio button from “Standard User” to “Administrator.”

Step 7. Click on “Change Account Type.” There you go, you have successfully changed the Administrator.
Let us see the next method, to do the same.
#2. How To Change Administrator in Windows: Step by Step
Step 1. Click on the Start Windows button,
Step2. Find “My Computer” and right-click on it.
Step 3. Now select “Manage,” and it will open up a window “Computer Management.”
Step 4. Now from the left pane choose “Local Users and Groups” and expand the list from it.
Step 5. Two folders will be there, select “Groups.” you would be able to see plenty of users along with the description on the right.
Step 6. Choose Administrators from the right pane and double click on it.
This will pop-up a window, where you would be able to see all the users, using the machine as an “Administrators.”

Step 7. Click on the Add button to add a new Administrator, and this will pop-up one more window.
Note: You can click on the Remove button if you would like to remove any particular existing user.
Step 8. Now Click on the Advanced button from there, this gives you one more window where you would be able to select the new user.

Step 9. Now click on the “Find Now” button, which will list out all the users using the machine.
Step 10. There you can select a user from the search results, whom you want to provide Administrator access and click on ok thrice to apply the new settings.

There you go, you have successfully changed the “Administrator“of the PC.
Do let us know which way would prefer the most, I like the second one, as it looks more professional.
But ultimately both ways work fine and do the job well.


