How to block inappropriate websites on Google Chrome? This is a very common question for every parent. As we all know every question has an answer. Enable parental control and get rid of worrying.
Enable Parental Control In Google Chrome
Parental Control is an inbuilt feature of Google Chrome, which block inappropriate websites for kids or any other users you wish to uses the same machine. Enabling a family filter on is always a good option to go with.
Monitoring the kids can be much easier with the parental control settings, which is also called as “Supervised Users” in Google Chrome.
In one of the earlier article, we had already discussed on one of the methods of blocking some websites in Windows, which is also an inbuilt feature of windows and can be applied without using any third-party application.
Setup Google Account For Child: Create New Supervised Users
You can add as many as supervised users in Chrome, whom you want to control with your parental account. If you are not sure how to create supervised users in Google Chrome, then you must go through this article. I am sure you have already created some Supervised Users, and now it’s time to manage and restrict them by enabling parental control settings.
Login into the parental account, before managing the supervised users.
Manage Supervised Users
Let us get into and start restricting and monitor the Supervised Users account, let us initiate the process.
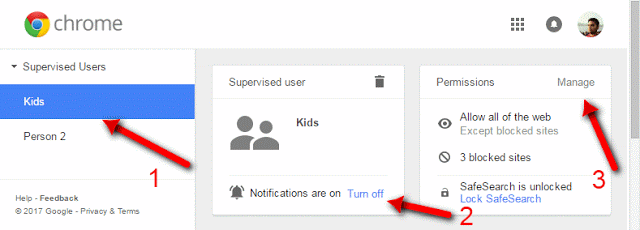
You can go to your browser settings and scroll down until you could find the “People” section or just click on here to get there to access the Supervised user’s Dashboard.
- Here you will be able to see all the supervised users.
- Turn On” the notifications, so that you could get to know about the activities of supervised users.
- Click on the “Manage” to restrict the websites you want to

Block Inappropriate Websites on Google Chrome
Once clicked on the above Manage button, a window will pop up as “Manage Permissions.” This is the central area where we can restrict all the websites, and we think the kids are addicted to it and uses it more often.
For instance, in the below image you can see that I had blocked a few favorite social websites just as an example. Your requirement or you might want something else. It is as simple as that, just need to enter the website name and click on the “OK” button.

So now I am sure that you have already entered all the websites which you don’t want to see by your kids while studying. Once performing the above action, the parent account has successfully configured with the restricted websites, and we are all set to manage the supervised users.
Now let us see how it actually works for the supervised users(Probably kids).
Family Filter On For Supervised Users
Now the drama starts once you block the websites, even though if the supervised users try to log in to the websites they want to, the result will be as shown in the below image.
And along with the error message Oops! you need permission to access this page, there will be also an option to ask permission as well. They can always hit the “Ask permission” button.

Manage Supervised Users: Approve / Deny
So just in case if the supervised users ask for the permission of any particular website to access by hitting the “Ask Permission“, the parental account will be getting a notification on the same. Check out the below image as an example for which website they want to access. Choose an option that you want to.

Activate The Child Lock Before Signing Out
For instance, we are done with our work, and the other supervised users (kids) want to use the computer now, so instead of closing the browser directly, you should go to the parental account and Click on “Exit and Child lock”.
This will sign off your account and immediately activate the child lock feature and restrict the other users according to the above settings done.

Disable Guest Browsing
In case you have already applied the Child lock by following the above steps and signed off from your account. But still, there will be an option of Guest Browsing, your supervised user may try the guest browsing as well.
So, in this case, your all effort of blocking sites went wrong. As anyone web sites can be accessed by the Guest Browsing option.
No need to worry at all, we can always disable the Guest browsing option before exiting from the parental account by hitting the “Exit and Child Lock” option.
Access the user’s area from the settings as shown below.

In this way, you would be able to manage and restrict users the way you want to. The key of the treasure is in your hand. Do, share, and comment if this helps.